
Testing Framework: A Component-First Approach to UI Test Automation
Improve your Page Object Model with components

As developers use components like tables, combos, and calendars to reuse code and develop the apps faster, you can also use components in your automated tests with your Page Object Model (POM) to include the common functions to execute any action on the component.
For example, you can add functions in a table to:
Get the headers of the table
Get the rows of a table
Count the rows in a table
Find an element in the table by Id or name
Get the rows of one column
The UI of the web app is not always the same; it changes with time, and sometimes companies decide to migrate a technology, for example, webforms, to react, angular, or vue. If you use components in your POM objects, you only need to create and replace new components in the constructor. I used this approach when one web app changed from web forms to angular. The automated tests were on Selenium C#, so I only needed to create new angular components and replace the components in the POM. I reutilized a lot of code and didn’t need to rewrite all the tests.
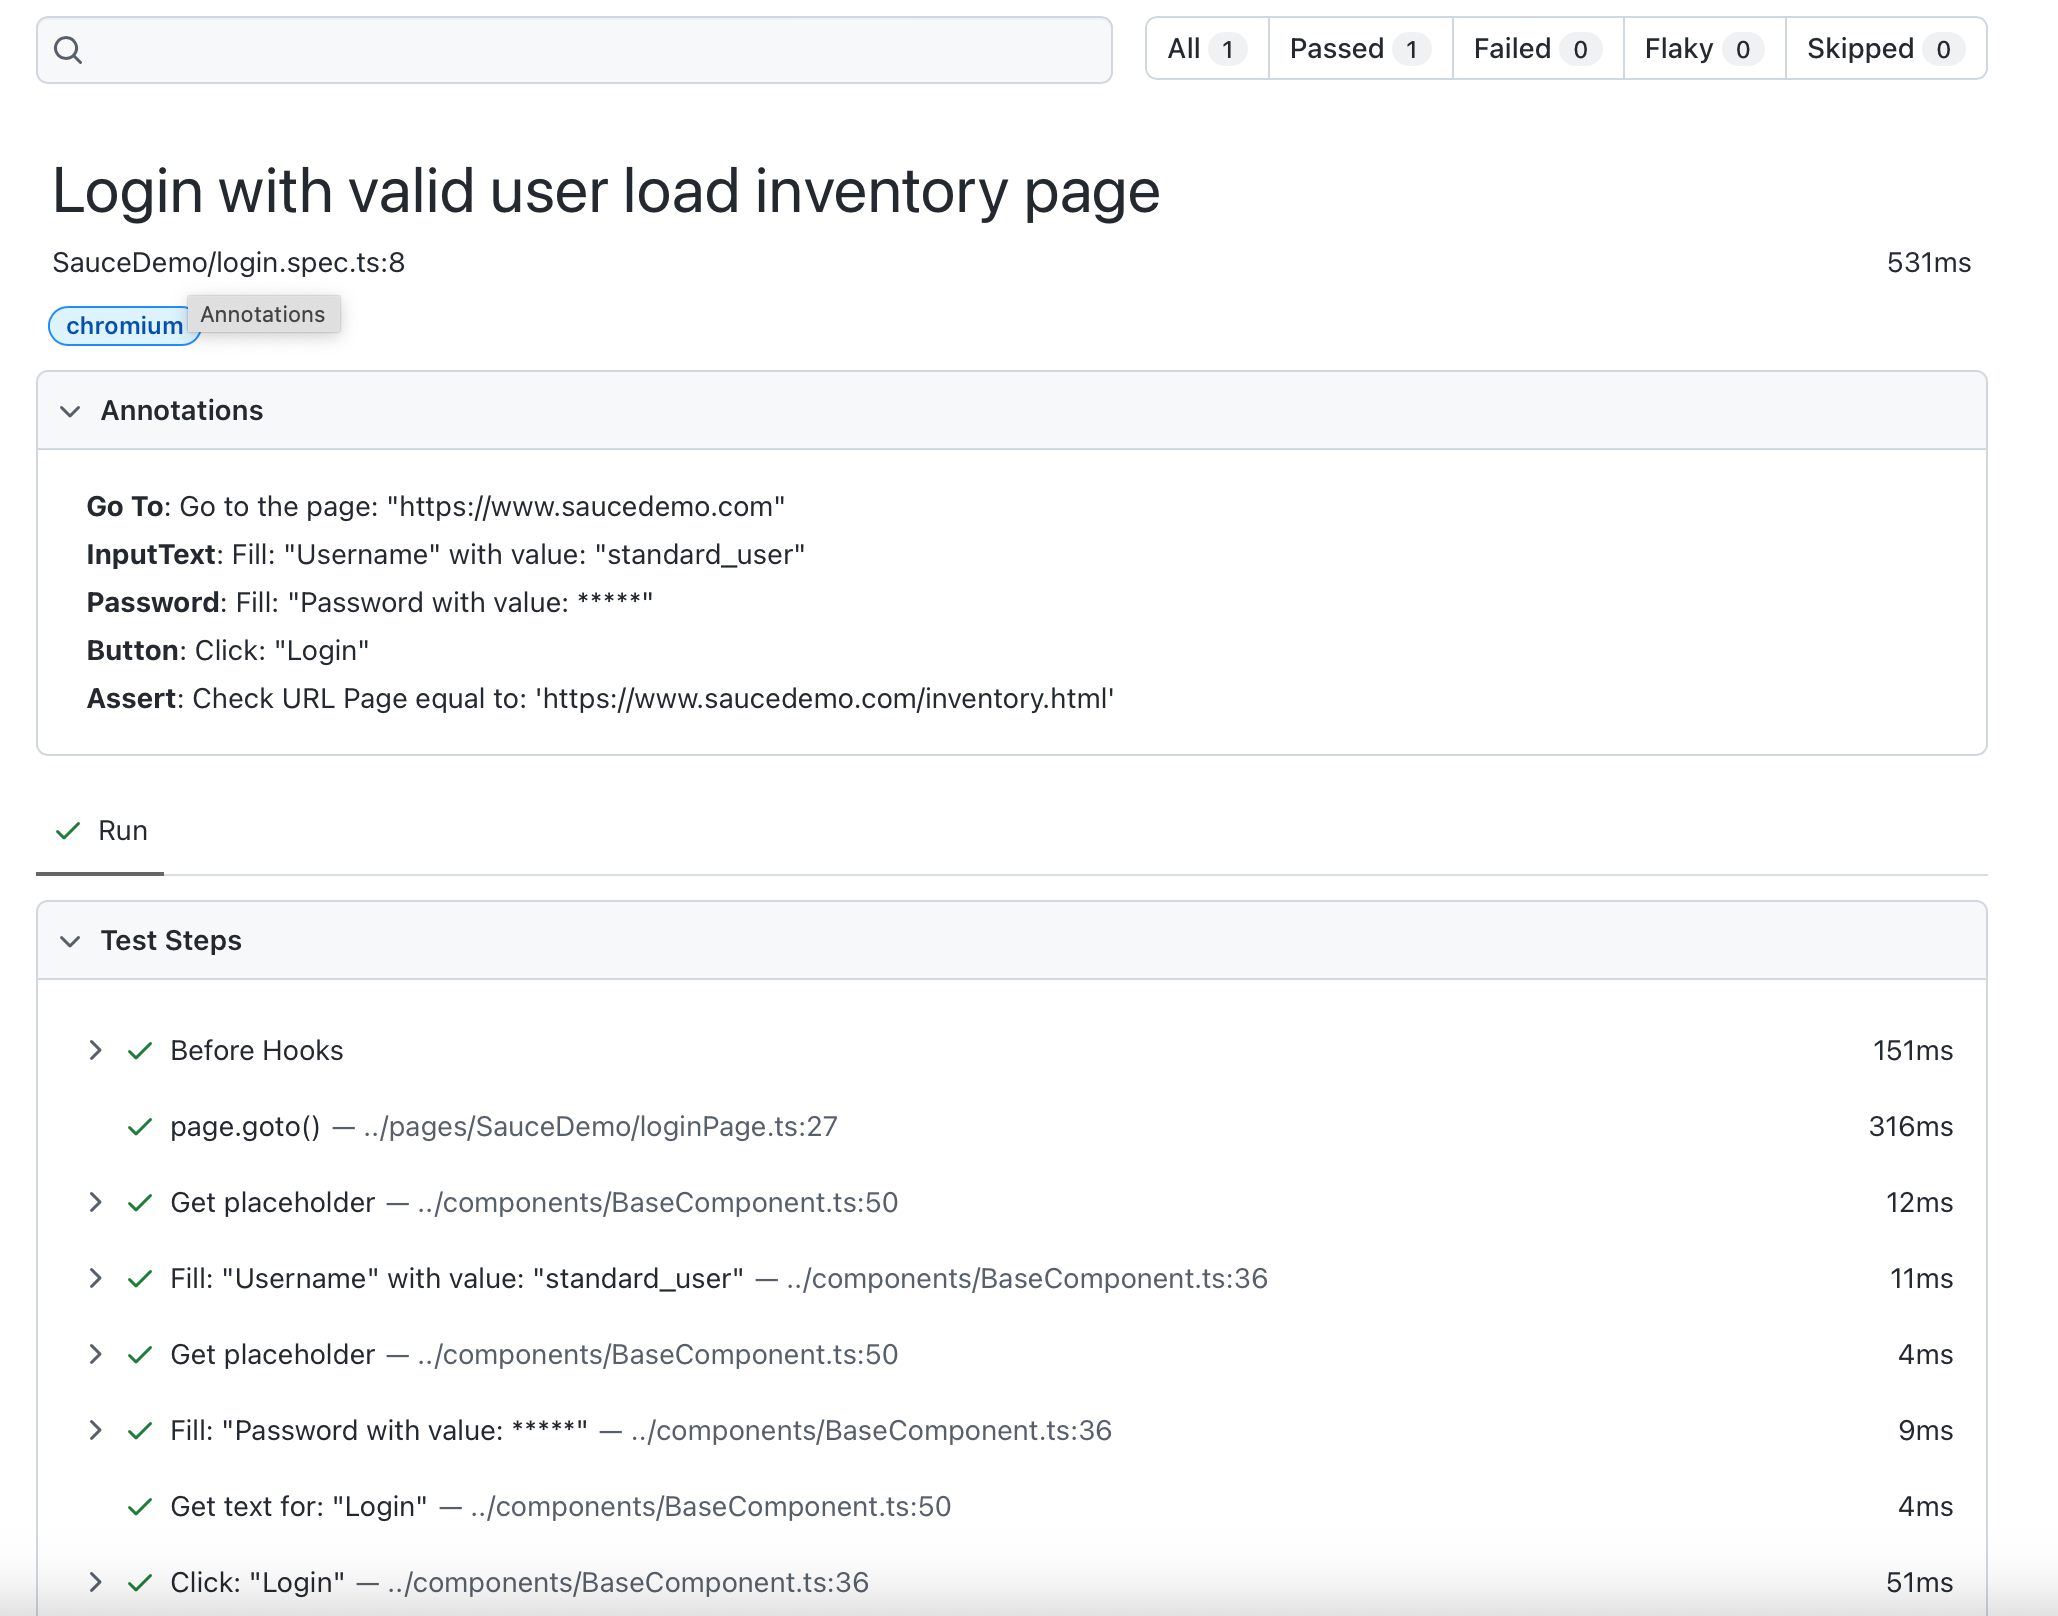
Another option you can include inside your component class is a user-friendly step description to autogenerate steps description from your automated steps. With auto-generated steps and a custom reporter, you can create the bugs from your test execution results. For accessibility testing, I created annotations with the steps and the details of the accessibility bugs, and I added an option to generate the bugs in Azure DevOps.
How to create components for your tests
First, create a component base class containing the functions available for all components.
In the constructor, I added the same selector that Playwright includes to select an element by role or with CSS selector.
I added some general functions to all components, like checking if it is visible and getting the name if it was not provided in the constructor.
import { Locator, Page, test } from '@playwright/test';
import { AnnotationHelper } from '../utils/annotations/AnnotationHelper';

export class BaseComponent {
    locator: Locator;
    name?: string;

    constructor(protected page: Page, protected annotationHelper: AnnotationHelper, selector: string, role: 'alert' | 'alertdialog' | .. | 'treeitem' = 'generic', byRole = false, name?: string) {
        this.locator = page.locator(selector);
        if (name !== undefined)
            this.name = name;
        if (byRole) {
            this.locator = page.getByRole(role, { name: selector });
            this.name = selector;
        }
    }

    async IsVisible(): Promise<boolean> {
        return await this.addStep(`Check if the ${this.name} is visible`, async () => {
            return this.locator.isVisible();
        });
    }

    async addStep(stepDescription: string, stepFunction: () => Promise<any>): Promise<any> {
        return await test.step(stepDescription, stepFunction);
    }

    async getName(): Promise<string> {
        return await test.step('Get the Name', async () => {
            if (this.name)
                return this.name;
            this.name = await this.locator.textContent() ?? '';
            return this.name.trim();
        });
    }
}
Create a class for each control on your page. In a login form, we have different components:
InputText
Password
Button
Link

I added the example for the button. I added a click function to autogenerate the step as a Click + button name. If the button's name was not provided in the constructor, we will try the text content, aria-label, or title attributes to get the button's name.
import test, { Page } from '@playwright/test';
import { BaseComponent } from './BaseComponent';
import { AnnotationHelper } from '../utils/annotations/AnnotationHelper';

export class Button extends BaseComponent {

    constructor(page: Page, annotationHelper: AnnotationHelper, selector: string, byRole = true, name = '') {
        super(page, annotationHelper, selector, 'button', byRole, name);
    }

    async click() {
        const stepDescription = `Click: "${await this.getName()}"`;
        await this.addStep(stepDescription, async () => {
            await this.locator.click();
        });
    }

    override async getName(): Promise<string> {
        return await test.step('Get the button text', async () => {
            if (this.name)
                return this.name;
            this.name = await this.locator.textContent() ?? '';
            if (!this.name || this.name == '')
                this.name = await this.locator.getAttribute('aria-label') ?? '';
            if (!this.name || this.name == '')
                this.name = await this.locator.getAttribute('title') ?? '';
            return this.name.trim();
        });
    }
}
How to add components to your Page Object Model
Now, you need to add the components to your POM class. You don’t need to manually add a click function for the login button or fill in the input for each element. You only need to call the function, click or fill.

import { Page } from '@playwright/test';
import { Button } from '../../components/Button';
import { InputPassword } from '../../components/InputPassword';
import { InputText } from '../../components/InputText';
import { BasePage } from '../basePage';

export class LoginPage extends BasePage {
    noByRole = false;
    readonly userName: InputText = new InputText(this.page, this.annotationHelper, '[data-test="username"]', this.noByRole);
    readonly password: InputPassword = new InputPassword(this.page, this.annotationHelper, '[data-test="password"]', this.noByRole);
    readonly login: Button = new Button(this.page, this.annotationHelper, 'Login');

    public BASE_URL = process.env.BASE_URL!;

    constructor(page: Page) {
        super(page, 'Login');
    }

    async goTo() {
        await this.addStep(AnnotationType.GoTo, stepDescription, async () => {
          await this.page.goto(url);
      });
    }

    public async loginWithUser(userName: string, password: string) {
        await this.userName.fill(userName);
        await this.password.fill(password);
        await this.login.click();
    }
}
How to create tests
Now, you can create tests using your components directly. You can access to the components and click on the elements, fill in the test cases.
test.describe('Normal user', () => {
    test.use({ storageState: 'auth/user.json' });
    test('Should returns user menu', {
        tag: ['@Basic'],
        annotation: [
            { type: AnnotationType.Description, description: 'Login to effiziente demo with a normal user, the user will see the menu for normal users' },
            { type: AnnotationType.Precondition, description: 'A valid normal user' },
        ],
    }, async ({ page }) => {
        const loginPage = new LoginPage(page);
        await loginPage.goTo();
        //For security is better add your user info in environment variables or some Key Value service
        await loginPage.loginWithUser(process.env.USER_NAME!, process.env.PASSWORD!);
        const dashboardPage = new DashboardPage(page);
        await dashboardPage.goTo();
        const menuInPage = await dashboardPage.menu.getMenus();
        const menus = ['AccountsReceivable', 'Config'];
        await dashboardPage.AssertArrayEqual(menuInPage, menus, `Menu are equal to: "${menus.toString()}"`);
    });
});
If you want to practice, you can add another function in the BaseComponent to AddAnnotation with the step description because sometimes Playwright includes some steps that aren’t wrapped into the test step, like some waitFor or it’s adding the get placeholder as a test step. But If you add only annotations, you can have human-readable steps in annotations.
I created this video to show how to create a test with components and API testing.
Also, I included the video generated by my accessibility POC that highlights the error element and a description of the error with different colors related to the severity.
You can check the complete code in my PlaywrightSample GitHub repository.
Thank you for reading, and feel free to suggest a topic for a new article and share if you think it is useful. Enjoy testing!!